Moebius 1:72 Scale SSN Skipjack: Development and R/C Conversion – Part 1
avatar

Report to the Cabal: Part 1

(A note to my long-time Cabal Report readers: this multi-part Report is the initial draft of what will become a proper instruction manual for those wishing to convert the Moebius Models 1/72 SKIPJACK plastic model kit into a fully capable R/C model submarine using the Caswell-Merriman fittings kit.)

As you get older you start to compile a ‘bucket-list’, those things you want to accomplish before you die.  I made mine decades ago – I tend to be a forward thinking type.  Near the top of the list, right next to ‘marry  a Filipino Princess’, was to help create a well detailed,  competently researched (hear that, Lindberg?!), and successful traditional  plastic model kit.  That promise to myself made long before I became the poster-boy of American R/C model submarining; at the time I prepared the list I had little appreciated that an injection-formed, polystyrene plastic model submarine could be successfully converted to R/C operation.

Decades after formulation of the bucket-list the two interests — plastic model kit production and r/c submarine building and driving — intersected as I  worked with Moebius to produce the 1/72 SKIPJACK kit while  producing product for the R/C submarine hobby with Caswell.

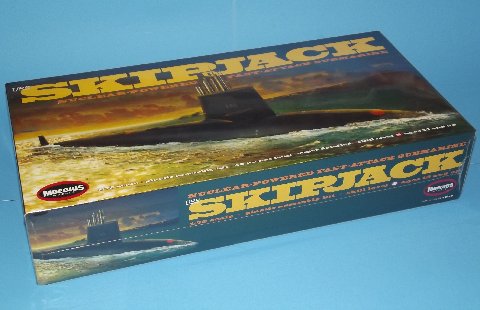
Moebius Models has just released a plastic model kit of a 1/72 SKIPJACK class submarine.  I was the lead man on that project.  A good history on the real  boats can be had here. (http://en.wikipedia.org/wiki/Skipjack_class_submarine)

About two years ago, I emailed the Moebius product development guy, Dave Metzner, suggesting they produce a 1/96 scale kit of the SKIPJACK class submarine.  I figured, what the hell, the worst thing he will say is ‘no’.  Nope.  The only thing he said was, “Too small. How about 1/72?” Holy-**it! Hell yeah!

And the rest, as they say, is history.  The guys at Moebius  are constantly pestered by fan-boys to make kits of some off-the-wall-never-get-your-money-back subjects.  I was mindful of that and respectful of their time and resources.  On the other hand, I’m not some no-body off the street.  My name – and more significantly, my work –  proceeded me; I got my hearing because of who I am (pisses you off, don’t  it) and what I’ve done; I’ve paid my dues in this game and cashed in occasionally, like this job with Moebius.

This is the contents of the kit: an excellent set of Bob Plant instructions, complete with a painting 
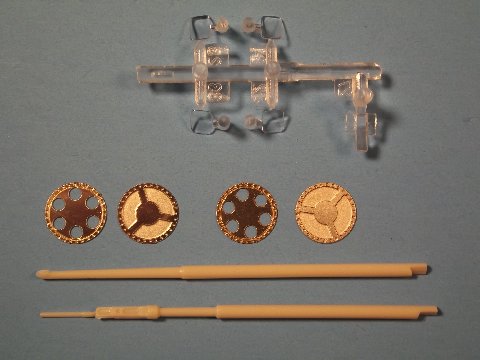
rguide; decal markings for all six boats of the class; clear parts for the four dead-lights and stern light;  sail; appendages; propeller; and a complete array of optical and electronic periscopes antennas, masts, including a well-detailed snorkel induction-exhaust mast.

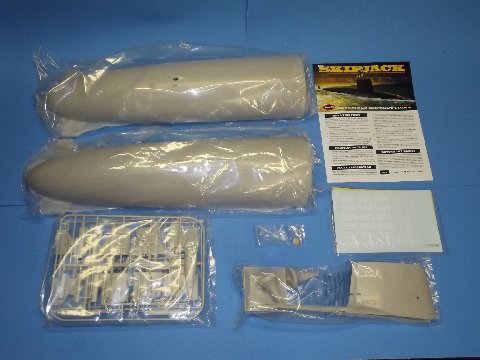
The hull comes in quarters.  Two bow halves and two stern halves – the bow and stern assembles joining at a very robust radial flange near the hull mid-point.  The hull (and this was no mistake) lends itself to being built as an upper and lower unit that can be opened up if the kit-assembler wishes to R/C this model.

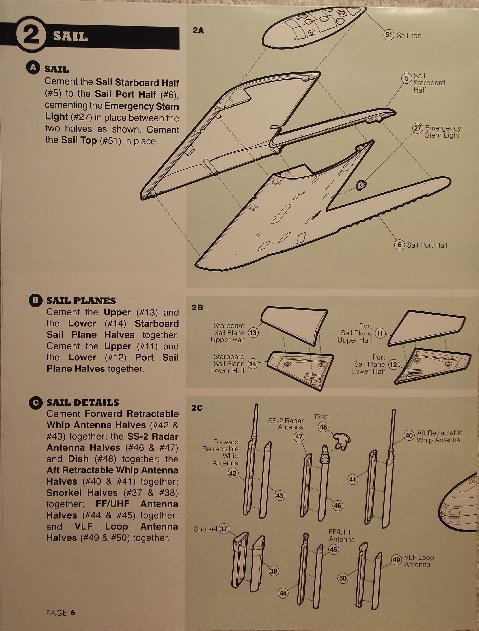
Just a sample page from the outstanding Bob Plant instruction booklet that accompanies the 1/72 SKIPJACK kit.  This is a far cry from the bare-bones exploded-view sketch provided with earlier Moebius kits.  A perfect balance of illustrations and text, in plain English.  No ‘chinglish’ here!  We all worked to keep the nomenclature of parts identified in the instruction on par with the descriptive words used by those who made and operated the real thing.

The man responsible for the box-art and instructions (and to no small degree the decal sheet) is Bob Plant.  He’s Moebius’ ‘Art’ guy.  I can not heap enough praise on the job he did on the instructions.  Bob’s work is in the tradition of the kits produced during the golden-era of plastic models kits, the  early 60’s to the mid-70’s.   If, after cracking the box on the Moebius Models 1/72 SKIPJACK kit you feel sweeping over you the joy you first felt as a kid doing this stuff, it is due to Bob’s capture of the look and feel  of the old, good-old-days.

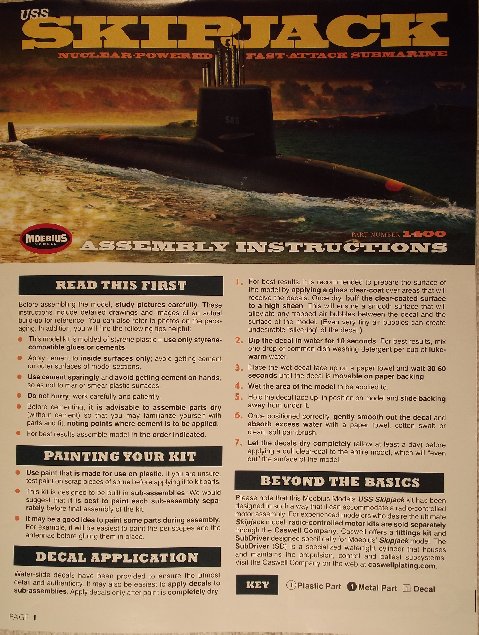
The box art on the first issue of this kit is a very well photo-shopped melding of a Dave Metzner build-up and Bob’s dramatization of a boat underway on the surface.  If there is a follow-up issuing of the kit, you  all are in for a real treat – the new box art will feature a dry dock scene from a noted kit illustrator.  Stay tuned on that.

The Moebius team worked long and hard to get the details right.  An example are the main sea-water (MSW) suction and discharge gratings – on the kit rendered as photo-etched (PE) stainless steel parts.  Getting the attack and night periscope right was a battle.  I spent several days researching the type-2  and type-15 scopes used by most of the boats of the SKIPJACK class.  We didn’t  get it right till the second test-shot.  This demonstrates the uncomplaining  willingness of Frank, Bob, and Dave to get the kit contents right before committing to production.

The Chinese (through no fault of they’re own) did not get it right the first time.  The mock-up, grown in a 3D printer, was severely flawed – the fault was mine, there were several paradoxes of form presented between the documents and scanning models I provided them.  And even after making physical corrections to the mock up, once it was scanned, and that file used to cut the initial tooling, the test shots revealed the need for further refinements.  We went through two test-shot cycles before all flaws were identified and corrected.  Only then did Dave give the green light to start series production.
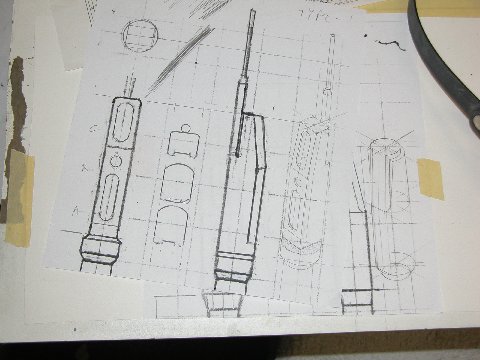
Periscope Drawing

More on the work done to correct the mock-up and test-shot flaws later.  Above are some of the orthographic and isometric drawings I prepared for the Chinese to help them get the scope heads right.

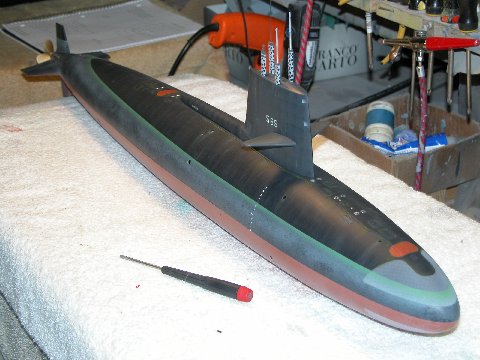
Nearly a decade before the Moebius project I had been operating a 1/72 SKIPJACK R/C model submarine – a fiberglass (GRP) and resin kit produced by Scale Shipyard.  The kit is one of the best quality articles that company produces – the accuracy of form and detailing is high; the parts were warp-free and no bubbles to fill.  Nice kit!

Scale ShipYard Skipjack at Nauticus

However, GRP-resin kits are not for the common kit-assembler; they require a great deal of talent to clean up, lay-out, assemble properly, and to get operational.  I know of only a hand-full of these kits out there working today.  Above you see my Scale Shipyard 1/72 SKIPJACK tooling around the fresh-water pond at Norfolk’s Nauticus museum where our club, the Elite Fleet,  puts on shows during the summer months.

The Scale Shipyard SKIPJACK’s a dead ringer for the Moebius kit.  It demonstrated to me that a mass-produced plastic model kit, if built robust enough, would be the perfect hull for the first-time  R/C submarine driver: Maneuverable, fast, and lacking the brittle little bits and pieces of a WW-2 era submarine that invariably break off during handling and use; the SKIPJACK is the perfect R/C submarine for those with itchy transmitter fingers.  Believe me, I know!

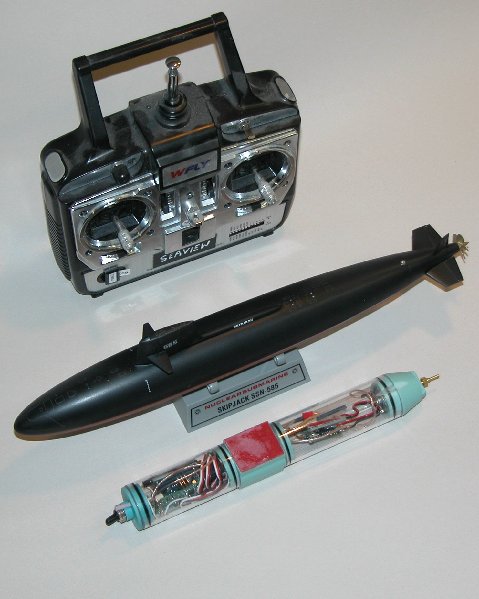
The SKIPJACK (all of my SKIPJACK’s) is operated as a wet-type R/C model submarine: the hull and sail are free-flooding structures.  The propulsion, control, and ballast sub-system elements are all contained within a single 3.5″  diameter Lexan cylinder.  That removable cylinder forming the brawn, brains, and  displacement changing mechanisms that animate the model.

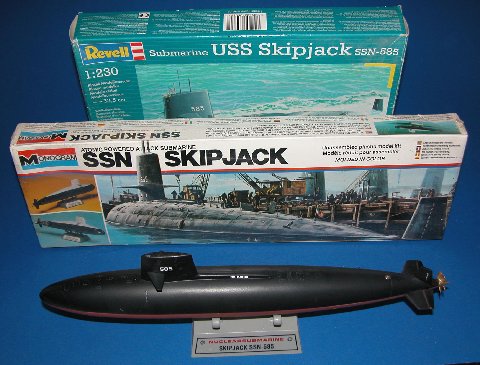
Aurora Skipjack reboxing by Monogram & Revell

How many of you old-timer’s remember this kit as a kid?  How many of you stuck a motor in this 13″ model and saw it chase across the pool only to smash into the other side with a sickening ‘crunch’? Come on! I can’t be the only one  to have done this?  Oh … you were the cherry-bomb type.  Sorry.

Electronics have matured to the point where even that small Aurora SKIPJACK can be R/C’ed! Caswell Inc. provides a fittings kit to convert the little model to R/C and they also sell the  Sub-Driver and devices needed to complete the job. (http://www.sub-driver.com/models/submarine-models/uss-skipjack-submarine/the-revell-skipjack-submarine-fittings-kit.html)

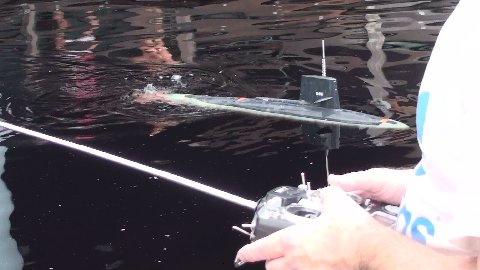
1/230 scale SKIPJACK as R/C boat

And our 1/96 scale, GRP-resin-metal SKIPJACK kit.  This was the size I first recommended to Moebius, but they preferred a larger, 1/72, sized kit – something that would be in scale with the excellent Revell 1/72 Type-7 and GATO  models.  A good call in my opinion.

1/96 scale R/C SKIPJACK

Prior to my assembly and use of the Scale Shipyard 1/72 SKIPJACK.  I had produced and marketed a 1/96 scale GRP-resin-metal kit of the SKIPJACK which I’ve been selling now for nearly twenty-five years.  Of course I’ve been driving  this version of the Beast around forever!  I’ve even produced R/C versions of the  little Aurora-Monogram-Revell 1/230 SKIPJACK – a model measuring only 13″ in  length.  The 1/230 and 1/96 scale SKIPJACKs pictured above.

Yeah … I’m Mr. SKIPJACK!

Trackbacks:
Posted in Modeling | Tagged , , | 4 Comments
Gallery

Scenes from Club Meetings
avatar

This gallery contains 5 photos.

I’ll be uploading photos from our HRSM meetings here on a regular basis. Check back after each monthly club meeting for new photos.

Posted in Member Gallery | Tagged | Leave a comment
Gallery

Scenes from 2012 Annual Model Auction
avatar

Here’s some shots from our recent auction.  Ed Rose stood in as the auctioneer.  Ed was seriously good at the task.   Seriously.

Posted in Member Gallery | Tagged | Leave a comment

Holiday Raffle Survey
avatar

HOLIDAY RAFFLE SURVEY RESULTS:

Total of ten responders, with 1 nay-sayer and 1 no input so eight guys made actual inputs to the survey with multiple ‘selections’ possible.  Most of the standard modeling scales had at least one ‘hit’ (1:144 was notably missing):

  1. 700 Ship: 3
  2. 350 Ships/Subs: 5
  3. 72 Armor: 4
  4. 72 Aircraft: 2
  5. 48 Armor: 1
  6. 48 Aircraft: 5
  7. 35 Armor: 4 (specifically Bronco kits were noted)
  8. Scale figures: 2

Tools & supplies also received 2 ‘votes’, something I personally had not considered.  Thanks to everyone who took time out to provide input.  We know it isn’t possible to meet every desire – as Bill B. noted, funding is a real issue – but at least we can have some basis for the selection of the raffle items, since a raffle that isn’t attractive to anyone will not get any “action”.  I expect there will be further discussion on Friday but that will have to be the final ‘word’ since there is a time crunch if anything is to be ordered.  Regards!

Original posting———————————————————–:

Holiday Meeting Raffle Survey – Please “Leave a Comment” to tell what YOU would like to see in Holiday Raffle.  Need this done by OCTOBER 15th so we can get the stuff ordered in time for December’s shindig.

Posted in Events | Tagged | Leave a comment

5th Annual Model Auction ‘Swap Meet’ 22 September
avatar

One man’s junk is another man’s treasure” – AUCTION REPORTEd and Gary at Auction

Once again, the club took a deep breath and rustled together a day of model tossing, kit tipping and glue sniffing.  Wait, no that was … never mind – there wasn’t any glue sniffing!  Instead, 22 intrepid local model hobbyists gathered together and dug through the closet cleanings of thirteen of their cohorts, battling to win under the capable gavel of club Secretary and Auctioneer Ed Rose.  The Auction followed the format from previous events, with doors opening at 10 am for folks to register with the auction ‘catalog’, get a ‘paddle’ and complete their lot sheets.  Prior to the noon start, there was plenty of opportunity to browse the sale items and catch some cheap but tasty lunch fare (full dressed chili dogs, chips & a drink for $2) but soon thereafter was a riot by the restless natives… nope, again, that was another occasion.  No riot, just a mugging…  Anyway, seriously, items set alone or in bunches to create ‘lots’ were arranged ready for Ed to kick off the action and then at 12:20, like a finely tuned machine, Ed and his “runners” chewed through the ninety-two lots in short order, averaging less than a minute apiece.  Even with a fifteen minute break, the auction was soon done, accounts settled and kits dispersed, then the church was cleaned up and all done by 2:30 pm.  Until next year…
Now here are the stats:
There were twenty-three participants (22 folks present – one was for ‘club’ kits), 13 sellers and 15 who won bids.  Average number of bids won was 4.1, average number sold was 7.5.  Average bid cost was $8.16.  Percentage of the 92 lots sold was 63.3%.  The “Award for Best Organized Seller” went to Scott Bregi for his pre-bagged and labeled lots, coming in the door.  All in all, a fun event and, as Roland Audet always says, “better any day than mowing the lawn!”

Saturday, 22 September 10am-4pm
Emmanuel Lutheran Church Community Hall  3900 Virginia Beach Blvd Virginia Beach, VA   (Map HERE)
Sell and Buy hobby kits, individually or (best) in grouped Lots.   More fun than the “usual” flea market swap meet format, our auction is fast moving and well organized.   Geared to the non-commercial kit trader (in short, regular modeler ‘Joes’) who has stuff to unload and is looking for some good cheap stuff, we provide inexpensive tasty refreshments on site so you don’t have to leave to get a snack or meal – and have more funds for plastic.  Minimal fee of $1 gets you 15 lots; if you need more, there is an additional but progressive fee aimed at keeping the auction moving by having the number of lots within reason.  Full details on the auction rules can be seen HERE.  Lot sheets (used to describe auction items) is found HERE.  So come on out and lighten your attic stash – or replenish it – or both!  (Auction Flyer is available HERE for download and distribution.)  Any questions, contact auction coordinator, Robert Beach.
Posted in Club Events | Tagged ,
Gallery

M42 ‘Duster’ Armored Anti-Aircraft Vehicle
avatar

This gallery contains 27 photos.

My recent visit to the ‘Americans in Wartime’ Museum’s Open House (aka ‘The Tank Farm’ Open House) provided a chance to get some unusual armor subjects ‘on film’.  This is my collection of images of the M42 “Duster” armored AA … Full Article→

Posted in Walkaround | Tagged , , | Leave a comment

Americans in Wartime Museum Open House
avatar

UPDATE: Six members of our local modeling fraternity took the drive to experience the Open House: Joe Koenig, Clint Mills, Jack Cairns, Dennis Tennant, Scott Bregi and Robert Beach.  Look for new walkaround gallery postings for fresh reference pictures for your armor modeling projects.  Beautiful weather and a well organized event made for some great memories (such as how cool a T-34 tank sounds rolling past!)  See the event pictures HERE.


The Americans in Wartime Museum is holding an Open House 18 & 19 August.  To attend, RSVP through their website at:

http://www.nmaw.org/

There is no charge, but you must ‘preregister’ through the RSVP.  If there is enough interest, it is possible there can be a club ‘road trip’ to the site which can share the cost of the trip while having good company, too!  The Museum is just south of the Prime Outlets, off I-95 toward DC (near Quantico) so a couple of hours or so of travel time should be expected.

Tom Jett passed this information along and says he has been there six times.  Must be worth the trip!

Posted in Events | Tagged , | Leave a comment
Gallery

2012 Americans In Wartime Museum Open House
avatar

Each year, the Americans In Wartime Museum holds an open house event at their restoration facility near Nokesville, VA.  This venue serves as a patriotic showcase for the efforts of the Museum and private citizens who seek to preserve the … Full Article→

Posted in Member Gallery | Tagged , , , | Leave a comment

Best Bang for your Buck? – 1:48 P-61 Update Sets
avatar

I’ve recently stumbled across yet another P-61 ‘Black Widow’ resin update set other than the True Details set I purchased a couple of months ago.  Obtaining copies of Mark Buchler’s Model Shack (now Flightline Engineering as of June 2016) set seemed like a good idea given its features, plus I also wanted his F11C Goshawk update for the old Lindberg kit (see his website HERE.)   Now I have an opportunity to review both the TD & Mark’s resin side-by-side.

Model Shack parts packaging

True Details parts packaging

Resin update sets for the Monogram 1:48 Black Widow are actually nothing new as Verlinden,  Aires, and Lone Star have all produced resin updates for this kit, as well as various others.  To save time, I defer to Swanny’s Models website for an excellent overview of the aftermarket for the Monogram P-61.  I will focus specifically on these two newest updates.

The new Great Wall Hobbies‘ P-61 kit seems to have renewed interest amongst the AMG (aftermarket ‘guys’.)  Most reviews of this latest kit are favorable, praising the  easy assembly and high level (and extent) of detail but the obviously undersized cowling openings and slightly incorrect profile has presented an opportunity to feed the AMS (advanced modeler’s syndrome) sufferers with some ‘easy’ fixes.  Here is an overview of the TD and Model Shack updates:

True Details parts

    • General TD: The True Details set is designed as a straight replacement for the GWH parts.  It consists of two of everything: cowling (sans cooling ‘gills’), prop blades, spinner and ‘spinner fairing’ (which depicts the small ‘cowling’ over the front of the engine casing that matches the diameter of the spinner), two magneto covers and a casing mounted ‘gizmo’, probably related to the prop controls on the real thing.  There are no instructions with the package. Cost: $13.49 plus s&h.
    • General MB-MS:Mark’s set, designed for both the Monogram and GWH kits, has two of everything also: engine cowling w/cooling ‘gills’, prop blades (with mounting jig & extra blade) and spinner, replacement multi-part engine (separate front row cylinders, engine casing and back-plate) and ‘spinner fairing with (you guessed it) two magneto covers.

      Model Shack P-61 parts

      Includes an ‘adapter’ to mount on the GWH kit and complete instructions.  Cost: $19 plus s&h.

Model Shack props with kit prop

    • Propeller & Spinner: Both provide replacement prop and spinners which would work for either kit, though the TD parts would require modifying the Monogram engine’s gearbox to fit. The TD ‘spinner fairing’ has the additional ‘gizmo’ detail but otherwise essentially the same.

      True Details props with kit prop

      True Details gearbox parts

      Model Shack gearbox parts

      The TD spinner is slightly more blunt in shape when compared to the MS spinner, which matches the profile of the Monogram kit almost exactly.  Looking at images of the P-61 spinner, both sets could do with having a bit more ‘point’ & taper to the tip, though the MS option is closer to the real thing.

  • Cowling: In the Monogram kit, one engine cowling is designed with open panels to display the full engine provided.  The other cowling is one piece but with attached open cooling gills such the two sides don’t match.  Mark’s cowlings appear to be copies of the ‘one piece’ cowling & gills part from the kit, modified to accommodate his new resin engines.  This requires removal of the closed cooling gills from the one nacelle in the Monogram kit – a simple sanding task not needed if used on the GWH kit.

    Model Shack cowling compared to kit

    True Details cowling shape compared to kit

    The TD cowlings (apparently based on the GWH parts) do not include the cooling gills (which are separate parts in the GWH kit), so to use them with the Monogram kit would take some additional effort either by scratch-building or swapping matching parts between kits – essentially making the TD cowlings redundant.  This is probably why TD offers just the replacement props and spinner parts as a separate set.  Perhaps TD should offer a modified set with gills to work specifically with the Monogram kit!

  • Closeup of Model Shark engine parts

    Engines: Only the Model Shack set includes engines to correct the asymmetric engine detail in the Mono kit.   This is logical as the GWH kit has some excellent engines included (in fact, better looking than Mark’s engines with two full cylinder rows and exhaust & intake pipe detail.)  One point however is the fact that the P-61 had deeply cowled, twin row engines so the Monogram designers must have reasoned, since you can’t really see much detail in that tight cowling, a simple ‘base-relief’, one part ‘engine’ would do just fine.  Problem is, having a full engine included on the other side really highlights the lack of detail, plus the Mono engines lack the

    Assembled Monogram engine

    proper ‘spinner fairing’, relying on a too long (deep?) spinner to represent the actual fairing.  Mark’s parts provide good detail with a correct engine casing & fairing, separate magneto parts and a full front row of cylinders matched to a ‘half-relief’ back-plate.  No push rods are provided but the instructions show how to use styrene rod (or stretched sprue) to add that detail.  One missed opportunity was to include intake & exhaust pipes for the front row onto the back-plate, a detail that would have further camouflaged the lack of full cylinders (something I suspect only visible using the ‘contest flashlight’ in any case.)  Although slightly undersized overall, the Mono kit engine does have the piping included for both rows, making it a nice little replica of the PW 2800 engine.   To use these engines in place of the little GWH gems seems a shame yet the provided adapters makes it easy to mount the assemblies to the front of the GWH nacelles with no modification.  Whether the GWH engines might be used in lieu of the resin parts, I cannot say as I don’t have that kit – yet(!?)

Model Shack instructions

In my opinion, both sets are pretty good value and nicely meet the goal of correcting whichever P-61 kit you might have.   Model Shack’s set does work with either kit by design while the True Details cowling set really is only geared to the Great Wall Hobbies kit.  So, for those like me that have a Monogram Black Widow kit (or two, or three!), Mark’s set really spruces things up with a minimum of effort.  I plan on using the two I have on two models then using the spare engines and cowlings from those two on a third model with open engines.  Fun, fun!

Further web resources can be currently found through:

Addendum: Here are four images from the Web that give a better idea of how the actual spinner was shaped (clicking the images will link you to the original sites.)  The first is almost directly from the side but a bit small – still, it gives a pretty good view of the shape.  Last one is from an angle but also shows the relationship of the cowling opening and spinner diameters (also, it too is a P-61C with a different engine than the P-61A/B, so be aware!)  The two right side images are views of the P-61A/B spinner which was essentially identical to the “C” version. From these, it appears that neither set is ‘spot-on’ but the Model Shack version is best of the two; both, being solid resin, can of course be sanded to an exactly correct profile, if desired.

P-61C cowling from side

P-61C cowling from side (courtesy of Flickr)

41-18882 (courtesy of Wikipedia)

YP-61 41-18882 (courtesy of Wikipedia)

P-61A on Iwo Jima (courtesy of www.7thfighter.com)

P-61A on Iwo Jima (courtesy of www.7thfighter.com)

(courtesy of Mark Allen on Photobucket)

P-61C (courtesy of Mark Allen on Photobucket)

Posted in Reviews | Tagged , , , , | 2 Comments
Gallery

2012 Virginia Shootout Show pictures
avatar

This gallery contains 45 photos.

2012 “Virginia Shootout” show in Roanoke, Virginia was held at the city’s nice & convenient Civic Center.  Put on by IPMS/Roanoke Valley chapter, the show was a nice one day event although the distance from Hampton Roads area is a … Full Article→

Posted in Member Gallery | Tagged , | Leave a comment