Report to the Cabal: Part 6
Marking Off, Test Fitting, and Punching holes
OK, you’ve culled out the unneeded Moebius 1/72 SKIPJACK kit parts; inventoried the fittings kit parts; degreased the resin parts; and scoured and sanded the hull, sail, and other appendages. Time to mark off and open up the hull and sail holes. These holes are needed to pass linkages, vent the hull and sail, permit flooding of the hull and sail, pass the control surface operating shafts, and to pass and accept the threads of screw fasteners used to hold the hull and sail assemblies together.
As the kit comes in the box, the hull is broken down into four large hull sections or quarters – two upper hull quarters and two lower hull quarters.
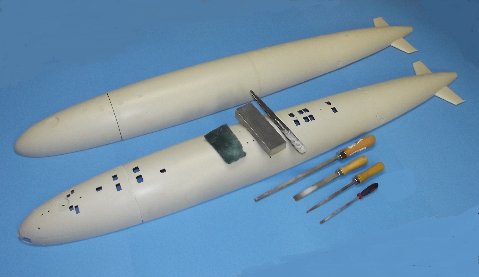
With the exception of the resin blanking plugs, don’t permanently glue anything together yet, though some of the below shots show assembled hull quarters. Do as I say, not as I do. Trust me, there’s a method to the madness here. Also, you’ll note in some photos that I have two SKIPJACKs in the shot. I’m not showing off. I do it this way to convey as much visual information as possible.
Fine. Let’s get to work:
You want to check the fit, within the hulls stern, of the stern planes and rudders, as well as the running gear foundation.
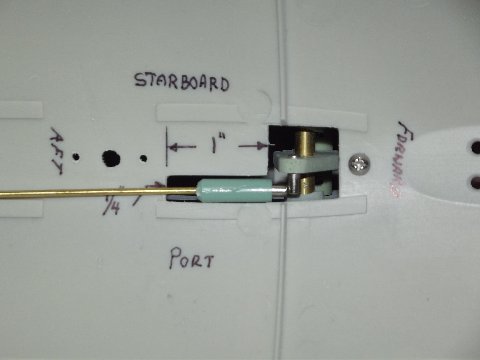
An error we failed to catch on the test shots was the too far forward positions of the rudder operating shafts. I corrected that by moving the center of rotation a bit farther aft to the cord of supplied resin rudders. However, you will have to relocate the rudder operating shaft hole, top and bottom.
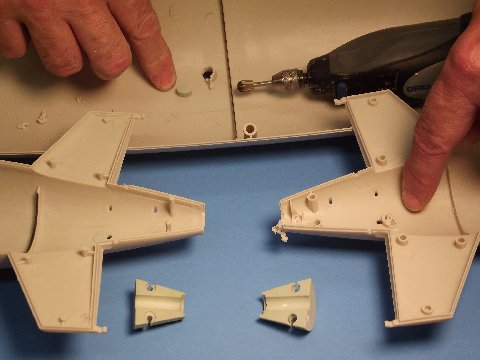
Take the two stern (aft) hull quarters, identify the 3/16″ diameter resin blanking pieces, and insert and CA each disc into a rudder operating shaft hole, leave a bit of the blanking disc standing proud of the hull so you can sand it to contour to the tight radius at that point of the stern. On the inside of the two stern quarters, grind flush the raised flanges of the former rudder operating shaft bores.
Back on the outside of the hull halves – from the center of a blanking disc, measure 1/4″ aft and drill a new 1/8″ diameter rudder operating shaft hole, top and bottom. You’re now ready to test fit the resin rudders and stern planes, running gear, and their associated yokes, push-rods, and intermediate drive shaft.
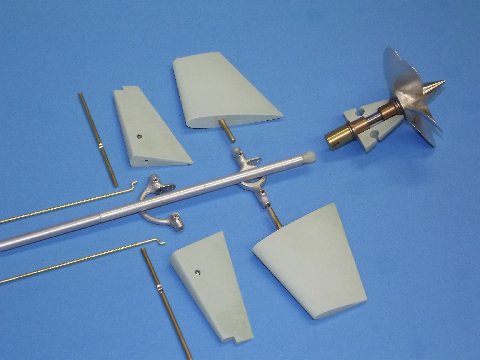
The function of the two white-metal yokes, which interconnect opposed control surfaces, is to provide clearance of the centrally running intermediate propeller drive shaft.
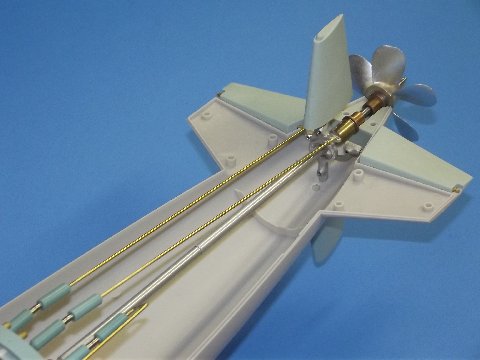
We’re going to test-fit the stern control surfaces and running gear into the lower after quarter of the hull and get comfortable with how the two types of control surface operating shafts make up to the yokes; make up the push-rods to the yokes and make up the intermediate drive shaft to the propeller shaft coupler. All this to check the components for fit and proper operation and to give you a good look at the assembly in operation (a chance to appreciate my magnificence) – something you won’t be able to do once the a stern cone portion of the aft upper hull quarter is permanently glued atop the aft lower hull quarter.
The rudders are rather straight-forward in that the upper portions of those operating shafts are permanently encapsulated in the cast resin rudders with projecting end of each operating shaft running directly into a rudder yoke bore and made fast with a set-screw. The rudder operating shafts have machined flats, insuring non-slip alignment between the two rudders when made up to the yoke.
The stern plane operating shafts, through necessity, have to be removable from the stern plane pieces themselves. This is because the outboard ends of the control surfaces fit within horizontal extensions that project aft and block a straight-in insertion of the stern plane with its operating shaft installed. So, I’ve made the stern plane operating shaft removable. Making up a stern plane to its yoke goes like this: astern plane is held behind its horizontal stabilizer by masking tape; the stern plane yoke, with attached push-rod, is suspended within the stern with the aid of either a long hemostat or needle-nosed pliers. The stern plane operating shaft (it’s flat oriented to present to the tip of the stern plane set-screw) is pushed through the hole in the center of the horizontal stabilizers outboard bearing, through the bore of the stern plan, and into the bore of the yoke till the outboard end of the operating shaft is flush with the outboard face of the horizontal stabilizer bearing. The operating shaft fully inserted, the stern plane set-screw is tightened (don’t over-tighten or you’ll strip the resin thread), keeping the shaft from rotating within the stern plane. Finally, the inboard end of the operating shaft is secured to the yoke by tightening the yokes set-screw. You want to orient the stern planes chord line perpendicular to the yokes bell-crank arm. Whew!
Oh … and for the sake of scale, orient the stern planes with the operating shaft set-screws on the bottom, out of eye-shot.
Employing 1/16″ diameter brass rod, make two push-rods, 7″ in length,each with a Z-bend at one end. One push-rod makes up to the rudder bell-crank, the other push-rod makes up to the stern plane bell-crank. Later, the forward end of these push-rods will receive a magnetic coupler that will engage a counterpart that makes up to a SD push-rod and servo. Magnets are used to couple the two linkage elements – no back-lash, no tools, no sweat. More on that later.
Two oblong holes, one in each of the bottom hull quarters, are intended to accept the stud of a display stand. Fine for static display of the model, but of no utility to those wishing to R/C the SKIPJACK model. Use the two resin blanking plugs to block those holes, as you did with the rudder holes -then grind away the raised flange within the hull quarter over those blanking plugs.
Take the two resin propeller shaft foundations and, after grinding away the radial and longitudinal raised braces at the stern of the two plastic aft hull quarters, test the foundations for a tight fit. Keep the aft lower hull quarter propeller shaft foundations in place for the next step, the dry-fit of the running gear and control surfaces.
Install the two rudders and two stern planes as seen below. And check for non-interference of control surfaces and yokes through the full travel (not to exceed 35-degrees left/right and rise/dive). Note how the intermediate drive-shaft runs through the center of the rudder yoke and over the swing-arm of the stern plane yoke.
The intermediate drive shaft is a 8 1/4″ long length of either .014″ wall thick, 7/32″ outside diameter brass or aluminum tubing with half a Dumas nylon dog-bone inserted into each end – each dog-bone pined to the shaft with a transverse length of 1/16″ brass rod, “peened” at each end. You’ll work out how much dog bone half projects past the tube as you integrate the running gear with the SD.
You’re going to saw away portions of the stern and bow from the respective hull quarters to establish a Z-type separation line between upper and lower hull sections. This is a long accepted hull access methodology popularized by R/C submarine pioneers, Dan Kachur and Greg Sharpe. This type break between the two hull halves provides for quick access (only one screw at the stern holds the hull halves together), is strong, and is less susceptible to flexing than a simpler horizontal break that runs completely around the bow and maybe even the stern
With the Z-break, a single screw presses the after halves of the hull together as a radial capture flange forward works to press the forward halves of the hull together. To achieve this Z-separation, you’ll remove portions of the bow and stern and weld them to the opposing hull section. Confusing? Look at the pretty pictures!
Take the forward lower hull quarter and aft upper hull quarter in hand and put the other quarter hull section out of the way so you don’t grab one of them by mistake when you start marking and cutting.
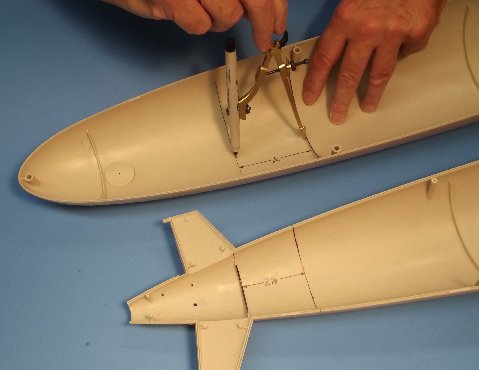
Now, to mark the radial lines around the hull quarters where you will saw them free. Any number of ways to accurately mark off a radial line on a tapered body-of-revolution. But, the easiest method, presented here, is to take advantage of the internal stiffening ribs molded within the hull quarters, using them as both guide, and datum line from which to identify the distance from bow and stern to cut the bow piece and stern piece away. Study the photo.
Load your compass with a Sharpie fine tip permanent ink pen. Let’s start with the forward lower hull quarter: Identify the second radial stiffening frame from the bow, that’s our datum line. Set the compass distance between point and pen tip at 3”, place the point into the right-angle union between hull and frame. Be careful to maintain the line between point and pen tip parallel with the hull quarters longitudinal axis as you move the compass laterally, mark a radial line into the inside of the hull quarter, that inked-in line denoting the bow cut line.
Do the same for the aft upper hull quarter. That datum frame is the one at the leading edge of the horizontal stabilizers. Set the compass so that the radial line established is 2-1/4″ forward of the datum frame.
It’s much easier to follow the cut line if it’s on the surface of the hull quarter, so now you have to transfer the inner cut line to an outer cut line. Plug in a 100 Watt light bulb, and use it to back-light the interior of the hull quarter so you can see the internal radial ink line through the translucent plastic. Pencil in cheat marks to the surface of the hull over the line you see through the hull. After enough points are put down to get an accurate indication as to the lines true form, lay down some masking tape, it’s edge at the cheat-marks, and ink in a proper cut line to the outside of the hull using the edge of the tape to guide the Sharpie pen point.
Remember, cut off the stern of the aft upper hull quarter, and cut off the bow of the forward lower hull quarter. Don’t screw up! And don’t cut these pieces off until later, we’re just marking things off at this point. Check twice and cut once!
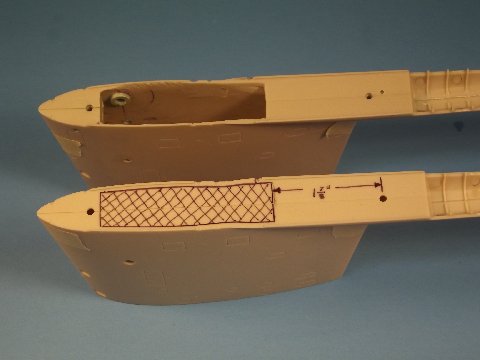
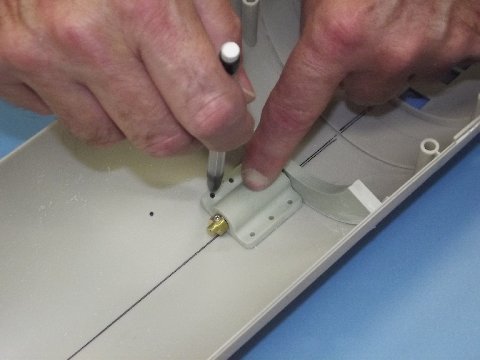
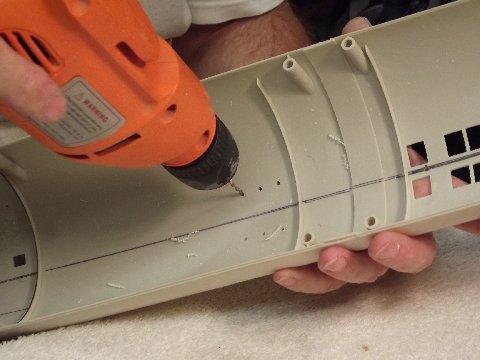
Mark, then drill or grind out the opening atop the two hull quarters. Right, you see two SKIPJACK upper hull pieces, the one atop has its holes opened up. The lower unit has just been marked off as to hole shape, location, and size. Use new (sharp) drill bits spun at low speed. Styrene takes to the bit well, but keep the pressure light as you punch through. The indented round depressions on the sides (upper and lower) of the hull quarters indicate drill sizes to use. For holes larger than 3/32”, start the hole with a 1/16″ bit, this serving as a pilot hole that better directs the cut of the larger bit that follows. When using high-speed cutting bits, do not let the bit stay in the work too long or the plastic will melt.
Punch out 7/16″ diameter holes in the centers of the six ballast tank vents on the forward deck flat. Do the same for the four ballast tank vents on the after deck flat. Don’t touch the four big MSW holes on the aft lower hull quarter after quarter hull section, those will later be covered by PE gratings.
The following hole locations are now marked off along center line on the forward upper hull quarter. Measurements are taken from the projecting nib, marked ‘datum’ on the above photograph, just aft of the forward deck flat:
- A square hole with forward transverse line 3/16″ from datum, and aft transverse line 5/8″ from datum. The longitudinal edges of this inked-in hole are 1/16″ inboard of the troughs that accept the indexing lips at the bottom of the sail assembly. Later the lower sail plane bell-crank gear will project through this hole.
- 2-1/4″ aft from datum is a 3/16″ hole that will pass the snorkel head-valve tube down into the hull. If you use the Caswell-Merriman 3.5 Sub-Driver unit, the SAS snorkel foundation piece will be used as a marking stencil to indicate where you’ll drill 1/16″ holes to accept the self-taping machine screws that secure the foundation atop the hull, under the sail. That foundation piece is seen atop the second hull in the picture.
- 6″ aft from datum is the first of three 1/4″ holes that vent air in and out of the hull, under the sail and exhaust fairing.
- 8″ aft from datum is the second 1/4″ vent hole.
- 10″ aft from datum is the third 1/4″ vent hole.
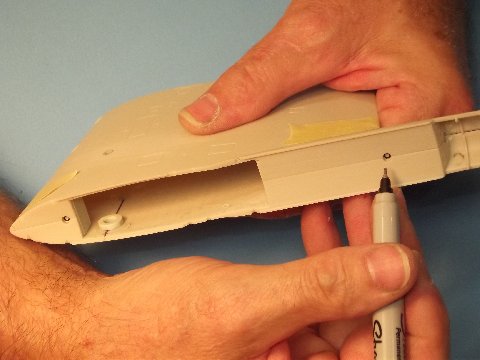
Once you have marked out the holes that go under the sail, snip the two nubs (indexing pins, if you will) off the hull and at their former location, drill 7/64″ holes. These will pass the 4-40 machine screws that hold the sail assembly down onto the upper hull. There is a third nub, back near the after portion of exhaust fairing, on the aft upper hull quarter. Snip it off too, but drill no hole there yet.
Flip the forward upper hull piece and work on the inside now.
Open a long, narrow extension of the square hole you just made. This will eventually pass the push-rod magnet that makes up to the magnet at the base of the lower element of the sail plane bellcrank assembly. Note the orientation, and the side where you put in the new cut, and it’s measurements. Now, grind away. The outboard longitudinal side of that the hole butts up against the raised portions of hull under the sail – those raised portions accommodate the longitudinal indexing troughs atop the hull. The photograph shows how the linkage goes in there once all these preliminary operations are out of the way. Take heart … you’ll eventually get there, pal.
With masking tape, put the two sail halves together, time to open up the bottom of the sail to pass the bow plane linkage (mounted within the sail) and snorkel head-valve assembly (mounted atop the hull, but fitting within the installed sail). The upper sail has already been opened up, the lower sail has been marked off and is ready for hostilities. I forgot to indicate on the model the distance from the forward hole (both of them already provided as the kit arrives) to the forward transverse line of the hole. It’s 3/16″ from the hole’s center.
Tack-glue the forward and after resin foundation pieces within one half of the sail, then tape the other half of the sail onto it. With a Sharpie pen mark off the spot where you will drill a 3/32″ hole and tap it for a 4-40 machine screw. Take everything apart and punch those holes and cut the threads into the sail foundation pieces.
Most apparent in this photo, at the base of the sail, at its perimeter, the plastic extends down into long-running lips that engage the deep troughs set within the top of the hull. The two 4-40 machine screws running up from within the hull into the resin foundations fixed in the sail make fast the sail to the hull, yet provide for quick and easy separation of the two for transportation, adjustment or repair.
The many square holes you have to punch open in the bottom of the two lower hull quarters is done with drill, square files and sanding sticks. The work goes pretty well if you take it easy and outline the inset gratings molded into the plastic with a Sharpie pen. Yes, you’ll loose all that beautiful detail, but to be a practical R/C model submarine that works as a wet-hull type, you need to lose the flood-drain grate detailing. Get to it!
I suggest you punch out all the holes before sticking the hull quarters together, the parts are easier to handle when they are smaller assemblies. Note on the lower hull that I’ve also taken advantage of the engraved lines of the torpedo tube shutter doors to open those up – that model will later be outfitted with six practical launchers.
A torpedo firing SKIPJACK is an option for you way-over-the-top R/C submariners. The torpedo nest foundation is provided with your fittings kit. If you go the hostility route, here’s the weapon system you would need to make the local lake safe for Democracy. (http://www.sub-driver.com/torpedo-systems/torpedo-system-1-72nd-scale.html) and a technical paper on the system. (http://support.caswellplating.com/index.php?/Knowledgebase/Article/View/359/47/torpedo-launcher-instructions-172)
Before installing the two sets of SD foundations, shock absorber, and SD Velcro strap foundation, it’s wise to mark out a center line to the inside of the lower hull quarters.
Examine the two sets of resin SD foundations provided. The smaller set goes aft and the cut-outs within those clearly defines where they butt up against a frame in the aft lower hull quarter. The other, larger set of foundations fits against the forward face of the aft-most frame in the forward lower hull quarter. Note that the circular edge at the top of these foundations is not concentric with the circular edge at the base. On both sets of foundations the narrower portions of the pieces of the foundation halves meet at the bottom of the hull – get that straight before CA’ing them permanently in place!
With the forward set of SD foundations glued against the frame, butt the after end of the shock-absorber (where the pin projects up) up against the forward face of the SD foundations. Center it, then using a thin pencil lead, mark onto the hull where the holes will be drilled to pass the six securing 2-56 machine screws.
Remove the shock absorber and grind away a 1/2″ wide, 3/8″ deep channel down between the two halves of the SD forward foundations. This channel permits disassembly of the shock-absorber components, should that every be necessary.
The forward end of the strap foundation butts up against the after face of the forward most frame of the aft lower hull quarter (the tall end of this resin piece goes forward, the shorter end goes aft). Lay the piece on its side within the hull and mark off where you will punch two 3/32″ diameter holes into the bottom of the hull, these will pass two 2-56 flat-head machine screws that secure the strap foundation piece to the lower hull. To be clear, the notch in the foundation piece goes down (against the hull) since the strap passes under the foundation.
Before drilling a hole, I push a pointed rat-tail file hard into the plastic, a sort of ‘pilot-hole’ that works to guide the drill bit as I open up the hole. Keeps the work centered.
Here I’m punching out 3/32″ holes to pass the flat-head 2-56 machine screws that secure the SD shock absorber to the bottom of the forward lower hull quarter.
On the outside of the hull, I will bevel these holes with a counter-sink bit to accept the flat-head screws that secure both the shock-absorber and strap foundation.
Trackbacks:

