Report to the Cabal: Part 5
Preparation
Only the most dense of you would miss the sub-text of the last four chapters. I’ve been selling you on both the Moebius Models plastic model kit of the SKIPJACK, as well as the Caswell-Merriman 1/72 SKIPJACK fittings kit. That said – and now distancing the discussion far enough away from the good Moebius people so as to spare them any collateral damage from the following admonition – I’m going to give you, those of you who wish to acquire both products, a dose of reality.
Anyone who can smear glue on styrene, and finds the Moebius SKIPJACK an attractive subject, I encourage to buy it and have a ball. It’s an easy kit to assemble, and is a stunning display piece. Get two, three, hell … get a case of those kits! You have my blessings. Knock yourself out.
However, you few out there thinking of going the full mile; those who plan to also get the Caswell-Merriman fittings kit, ask yourself this: Why? That fittings kit is for the conversion of the Moebius and Scale Shipyard 1/72 SKIPJACK kit to radio control, that fittings kit is good for nothing else. You sure you want to do this? Think about this long and hard before you plunk down your cash.
You’re not listening, are you? Fine. I’ll try this:
The most demanding arena to play in within the R/C vehicle hobby is R/C model submarining. The construction, set-up, successful operation, maintenance, and repair of R/C model submarines takes considerable skill and determination – this is not an entry level activity; you don’t do this successfully unless you already have experience assembling, setting up, and operating other, simpler R/C type vehicles. You don’t run a marathon out of the womb. You don’t get into R/C model submarining (at this level) unless you are an accomplished R/C flyer, driver, or robot fighter. Crawl, walk, jog, run! Same with R/C submarining. Don’t buy the fittings kit (any fittings kit) unless you know your way around R/C systems, are pretty good on the sticks, have substantial model-building skills, and you have money to spend.
If your primary income is a government check, stop right here, pal, this is not a poor man’s game. It’s for elite Craftsmen. Do you qualify?
Or, would you rather I sweet-talk you, suggest that your poop don’t stink, then sell you stuff that is way out of your league?
The rest of the chapters to this Cabal Report constitute the ‘how-to’ of integrating the fittings kit elements to those of the 1/72 SKIPJACK kit. All my warnings issued, I have to make the assumption you have a well outfitted workspace, you have good hands, you can problem solve without having to be spoon-fed, and you have the cash to play this game.
About the money: The SKIPJACK kit and fittings kit are a small fraction of the eventual outlay of funds to see the project through. You still have a Sub-driver to buy. Add to that the batteries, charger, R/C system, angle-keeper, fail-safe, speed controller, servos, Lipo-Guard, BEC, receiver, and so forth. Before you even get your completed R/C model submarine to the waters edge you will have pumped over fifteen-hundred-dollars into the project. Do you want to risk all that cash as you send your little submarine to the bottom of the lake? Think before you whip out that credit card!
The Moebius kit parts you will use, if you convert to R/C, are seen here – all the other items that come in that box you can bag and put in the ‘parts bin’. To the right of the decal sheet are the contents of the Caswell-Merriman fittings kit. Integrate these items with the SKIPJACK and it will be ready to receive the 3.5 SKIPJACK Sub-driver (SD), and Caswell 1/72 SKIPJACK ballast weight-foam kit.
What is it they say about a boat being a hole in the water into which you shovel money? They’re right. Have I scared you away yet?
OK, let’s say you got stupid, made your purchases, and are now hiding your credit-card receipts from the Wife. Let’s get to work:
During the casting process, the resin forming tools are given an obscenely large amount of silicon mold-release spray in order to extend tool life and ease the extraction after the resin changes state. Much of this primer and paint inhibiting oil stays on the part, and has to be completely removed before you can get any type of adhesive bond to it. Degrease ALL of the resin parts.
Take the torpedo tube foundation assembly apart (if you’re going to us it, it’s the only optional item in the fittings kit), pull the operating shafts out of the stern planes, as well as their set-screws; and gut the SD shock absorber – this to get full access to the resin surfaces without hardware getting in the way. Put some gloves on, or this stuff will tear you up. And work in a well ventilated space, don’t get any in your eyes, and this stuff is very flammable so make sure you don’t have any ignition sources nearby. Nasty stuff, but it will degrease your resin parts. Do not get any on the styrene parts!
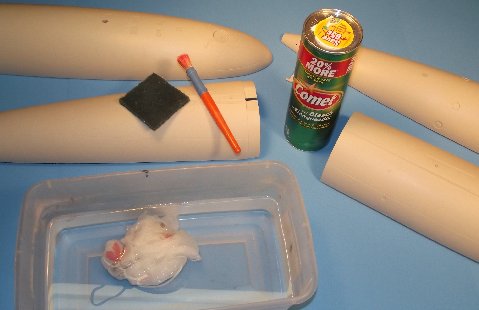
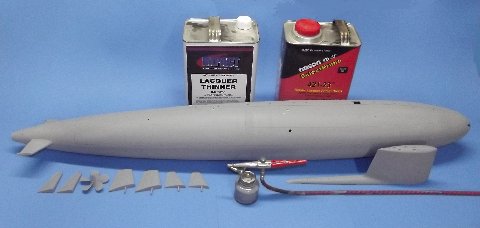
The degreasing liquid of choice is lacquer thinner or straight acetone: a resin part is immersed in the liquid for a minute or so (too long and the part starts to wrinkle), and as it soaks, scrub all surfaces of the part with a very stiff brush, like the stencil-brush pictured above. Pull the part out and scrub the surfaces you can get at with a soaked abrasive pad. Dunk the part one last time to wash off residue, pull out and wipe and blow to remove any clinging lacquer thinner/acetone.
Pull up a small tub of fresh water, some scourging powder, a fresh abrasive pad (that’s never seen lacquer thinner or acetone), a virgin stiff brush, wash-cloth and paper towels. And don’t let the pretty picture above fool you, it’s going to get messy. In fact, this task is best done in the tub with the shower running. In a cup put in some scouring powder, add some water and mix it up to a gooey slurry. Dip your abrasive pad, wash-cloth, and stencil-brush into the abrasive and rub it vigorously over and into all polystyrene parts as well as the resin control surface parts. Keep the work wet. Which abrasive polishing tool you use depends on the geometry and accessibility of the item being scrubbed.
When done, put the work under warm running water and scrub till the soapy scouring powder is washed completely away.
This step removes any parting grease still clinging to the injection formed parts (yes, plastic model kits sometimes come out of the box NOT READY for priming and painting). This coarse polishing imparts small scratches onto the parts surface, ‘tooth’ that will greatly enhance the sticking power of later primer, cohesive, filler and paint. This is a step that should be performed on all injection formed plastic model kits, no matter what you’re going to eventually do with them. But, wait! There’s more …
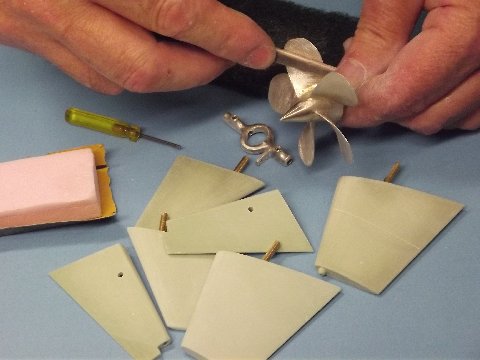
I’ll assume you know how to make and use a sanding-block. You’re going to use both hard (stiff piece of wood) and soft (flexible piece of foam or rubber) backing blocks. Hard blocks on parts of simple curve, like the above control surfaces and sail sides. You’ll employ the soft blocks on structures of compound curve, like the hull quarters, top of sail, fillet between exhaust fairing and sail, and propeller fillets. I classify those great foam-core sanding sticks as mini soft sanding blocks – you see one of those used above to knock flash off the cast white-metal propeller.
You’ll employ #240, #400, and #600 grit wet-and-dry sandpaper. but this initial sanding of all styrene and resin control surfaces parts will be done with #400 – to insure the removal of all substances that would inhibit adhesion and to render mechanical tooth to the parts to better hold the filler, putty, and primer applied later. You want the primer and paint to stick to the work, don’t you? You don’t want to suffer ‘fish-eye’ in the paint job, right? There is a strong possibility you will suffer these problems should you fail to degrease, coarse polish, and sand the parts. This is what can happen: You assemble the parts, fill the seams, prime, paint, applied masking and you paint again, you yank off the masking tape and peel all or some of the primer-paint under the masking off the models surface …. Yikes! The primer was blocked from proper adhesion to the plastics/fillers/putties surface because contaminates got in the way.
An R/C model experiences a lot more stress on its coating system than a static display model safely tucked into a display case does. The R/C model is subject to collisions and grounding, and handling ‘accidents’; its coating system is exposed to a significant amount of UV which only non-hobby type coating systems are formulated to tolerate; and the different expansion rates of the coating system and substrates puts a great deal of shearing force between the two (a very warm model submarine that has been sitting under the hot July sun, suddenly dunked into sixty-degree fresh water). All examples of environmental conditions that attack your nice paint-job. You want that primer, filler, putty and paint to stick to the model parts as tightly as you can arrange. Hence all the substrate preparation I’ve outlined above. Not suggestions. These are things you got to do.
The flats at the outboard ends of the stern planes, the top of the upper rudder around the anchor-light, the safety-track running atop the upper hull and the near right-angle union between the horizontal stabilizers and hull require careful, precise sanding with a stiff, but thin sanding tool.
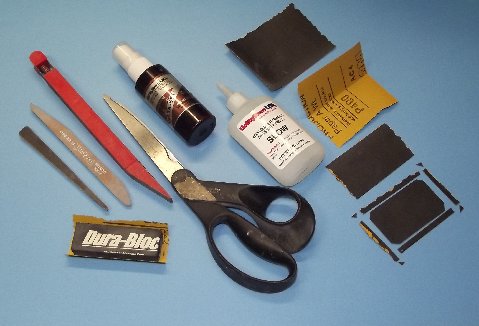
Such an abrasive tool is made by folding over a piece of suitable grit sandpaper to form a crease at its center, you then spray some CA setting solution onto the back-side of the sandpaper, coat one half quickly with some CA, then fold it over and clamp it till the CA cures hard. The stiff, double-sided sanding pad is then trimmed at all edges and corners with a scissors, and it’s ready for use. Just another abrasive tool in your arsenal of sanding sticks and sanding blocks. A very handy tool indeed.
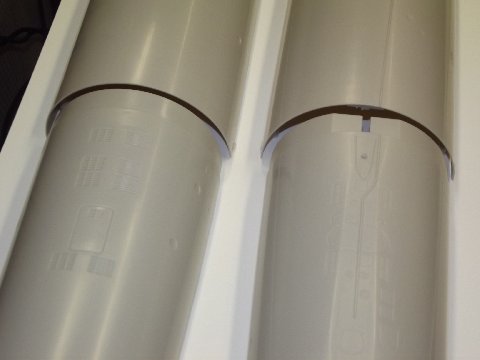
Some, but not all of the Moebius kits suffer from an outward bowing (warp) of the two hull bow quarters. You see this in the photo here. You can live with it and rely on the registration pins and the tongue-in-groove edges that run the length of each hull quarters longitudinal edge to pull the parts together, or you can apply some heat to the two warped hull quarters and coax them back to the correct diameter. That’s what I did. An operation not for the faint of heart!
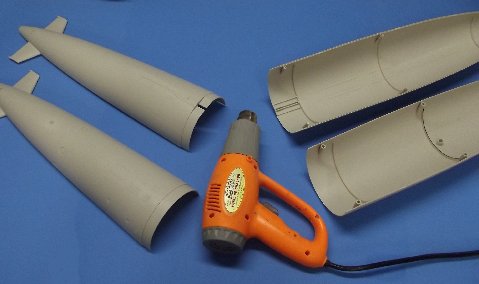 A hair-dryer is not going to cut it – you need an industrial strength hot-air gun like this one I got from Harbor-Freight (I LOVE Harbor-freight!). To avoid disaster, you must keep the gun in motion over the work, and to get as even a heat distribution to a hull quarter as you can.
Be warned: you fail to evenly heat the work and produce a hot-spot you will either punch a hole in the part or distort it beyond repair causing you to issue a primordial scream and stomp around in a blind rage. Some fun, huh!
Believe it or not, it worked for me – but then again, I’ve been doing this sort of scary sh*t for decades. There’s a lot of burned, cut, sawed, melted, and stomped-to-death failures in my wake.
I simply held the work in one hand, applied the heat evenly, and when things got toasty (painful) I squeezed the hull into a proper half-round. Don’t wear oven-mitts when you do this – you’re pinkies will tell you when things get hot enough.
A smarter way of doing this is to attach two wooden fences to a flat board, and jam the hull quarter between the fences, apply the heat, then let the work sit there till it assumes room temperature – the smart-money is on that technique, not the hand-held one.
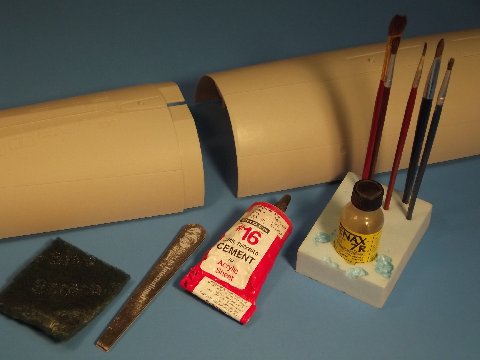
Unlike resin and metal parts, polystyrene – the plastic most injection formed kits are made of – is a thermoplastic that lends itself to chemical and thermal welding: the introduction of heat or a solvent breaks the molecular chains, a characteristic of a solid, and momentarily changes the state of the material to a liquid or semi-liquid where, upon freezing or dissipation of the solvent, the new array of interlinking molecules cross over the seam line bridging the former gap, leaving a single item where there was once two. A fusion weld. The process is called cohesion.
And that’s what the two solvent type cements above do. They melt styrene plastic. This is the preferred means of attaching styrene pieces to one another. The very thin solvent, applied with a brush, is used to soften the surface of the parts to be welded – akin to preheating metal before effecting the weld. The gelled solvent cement, in the red tube, gives up its solvent much slower, giving you the time to apply it to one softened surface and mash it down onto the other, and work out any misalignment.
When you stick two or more pieces together by introducing a third ingredient that remains to anchor the pieces together, that’s called an adhesive. CA, epoxy-glue, white glue, horse-glue, solder (yes, solder) and so many others are adhesives. No fusion here, it’s the adhesives wetting ability, to get in close to the atoms of the substrate, that puts into play a mysterious (to me anyway) ‘bonding force’ between the parts and adhesive. Though, in some arrangements, mechanical tooth or physical interlocking of the parts can and will enhance the holding power of the adhesive bonded joint. We’ll use CA on this job to join dissimilar materials to one another – situations where a fusion weld is not practical with street-legal chemistry.
If at all possible use the DuPont brand primer (Nason), paint (Chroma-Color), and clear-coat (Chroma-Clear) with flattening agent. You’ll find this stuff at a local automotive refinishing supply house. Look ’em up!
Second choice is rattle-can paint from a box-store, something like RustOleum or Krylon brands. But, decant the stuff and shoot it through a medium sized single-action air-brush/gun like my old trusty Paasche H-model seen above – use the big tip and needle. Get cans of the primary colors, black, white, and primer – the primaries so you can mix them up to get the colors you need (very dark gray, brick red, and international orange). And pick up low-tack masking tape and a color wheel.
Don’t use hobby-store paint. It’s all crap, that stuff is formulated to be safe, not good. You need a paint that has high abrasion, UV, and chemical resistance; and is flexible and has superior sticking power.
(You’ll find nothing useful in today’s brick-and-mortar hobby store but glue, blades, and magazines. The pimple-faced counter-person, likely some punk R/C racing type with metal studs and rings projecting from lips, lids, and ears; an uncooperative, smart-ass, cash-register monkey more preoccupied with the timing of his next smoke-break than any technical or stock questions you need answers for. You dare talk to one of these dorks and all they can hear is a Charlie Brown – Whaa, whaa-whaa, whaa, whaa-whaa, whaa… @#$% em!)
Do your tool and consumables shopping at the DIY box-store, auto refinishing house, Harbor-Freight, and the Internet.
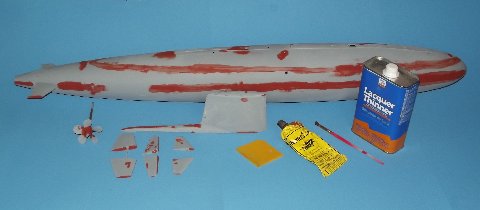
You’ll use an air-dry putty for scratches and low-fill seam work. I recommend the Nitro-Stan line. you can use it straight out of the tube (also available in cans), but you’ll find that it’s best applied with a brush, screeding blade (that yellow thing next to the tube of putty), or finger. When brushing it into tight unions cut the putty a bit with lacquer thinner, makes it flow better. The automotive refinishing supply house has it or something very much like it, likely 3M Red.
And get some two-part, polyester auto filler, like Bondo, for the deep seams and re-contouring work. I prefer the Evercoat brand. You can get that from the Caswell company. In fact, you can get just about all the tools, abrasives, and other consumables from that single source. (http://www.caswellplating.com/)
Yes, yes …. I’m a whore. Sue me!
Trackbacks:


