
Scribing Demo via Robert Beach (IPMS-USA #9460) (Download copy – Here)
NOTES:
Video – Paul Budzik (https://www.paulbudzik.com) has a very good intro to scibing techniques, among many other topics.
Why? Scratchbuilding, repairs, accurizing, using good kits that have raised panel detailing
How? Courage and creativity and practice with your tools:
Tools
-Needle/scriber points
-Engravers (Tamiya/UMM-USA)
-Micro chisels
-Scrapers
-Sanding/smoothing (sanding sticks/scuff pads/needle files. wet-n-dry sandpaper)
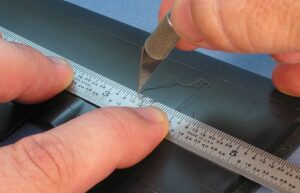
-Templates, eraser shields / soft copper sheet, straight edges, tape
-Clothes pins, small clips for clamping
-Lighting/magnification
-Micro saws
-Drills
-Pencil/ruler/compass for measuring
-Plans that show details
Technique – Take your time!
-Bracing (table top/fingers/clamping templates & straight edges)
-Pressure (plastic ‘grain’/progressive)- Use gentle, controlled strokes, block endpoints with fingers to prevent over runs
-Practice on internal surface of parts to get the feel for the plastic.
-Start shallow then deepen to desired depth/width with repeated strokes. Don’t do all at once!
-Start easy, start at ends, end in the middle if possible.
-Pointed scriber then use engraver if needed, sand/file raised plastic edges as needed to smooth
-Clean out dust using pointed scriber or sharp, short needle (slightly blunted and smoothed)
-Also, can use soft paint brush to clean out grooves
-Final ‘clean up’ with light coat of thin cement (dissolves the dust)
-Pointed scriber used for shape templates.
-Fillers & glued joints: CA scribes cleanly, surface putties can ‘flake’, test first. Joints can be soft, take care to prevent gouging. 3M Acryl-White Glazing Putty is excellent for surface repair and scribes cleanly. All putties should be allowed to fully cure before sanding and scribing.
-Repairs (CA filler/applicator/file/sand)-Use point applicator for CA, apply just enough to fill defect, allow to harden without accelerator, then file, then use fine sanding stick to smooth.
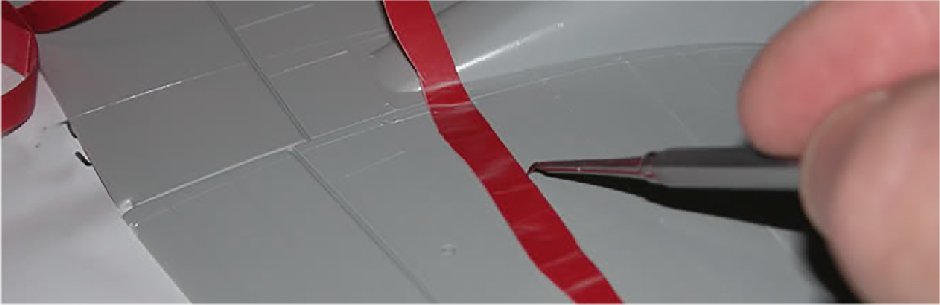
-Straight edges (tape/metal) Templates: CLAMP it/ TAPE it, make sure it will not move. Do Not use too much pressure.
-Handmade templates (clear plastic best, brass sheet for small shapes, copper or aluminum (drink can) sheet for flexible ‘profile’ straight edges or shapes like access panels)
-Freehand? Can follow existing raised panel lines but takes practice & the engraved line is slightly offset – pay attention to which side you’re following.
Resources:
Internet: Videos (You-Tube), sourcing tools
Tool Sources:
UMM-USA – https://umm-usa.com/
Scribers, chisels, templates and rivet systems
MicroMark – https://micromark.com/
loads of tools, templates and other guides
Tamiya – https://www.tamiya.com/english/tools/index.html
Selection of drills, punches, engravers, templates. Good quality,if pricey, selection. Especially the tool handle that takes different size scriber
‘bits’.
Online Suppliers:
Sprue Brothers – https://spruebrothers.com/tools-supplies/
Squadron Shop – https://squadron.com/tools/
Amazon – https://www.amazon.com (search for :Scriber Marking Tools)
Hobby shops
Practice! Practice helps develop the ‘feel’ for the technique.Dive in and have fun!
Presentation:
Discuss engraving rationale
Point to examples (Monogram F-16 & F-14, MPC A-Wing, Lindberg F7U-1 Cutlass)
Methodology
Scribe as much before assembly as possible (when scribing base plastic)
Test on inside surfaces to get the ‘feel’ of how the plastic scribes (plastic has a “grain” due to the injection flows)
Light touch, repeated light passes instead of fewer harder ‘draws’.
Confirm details to be worked and where. Remove any raised lines unless being used as guide (where correct)
Use a pencil to help keep stuff straight. Complicated panel patterns can easily get confusing
Use good light for viewing the work directionally.
Silver plastic shows a raised line even after it is sanded off.
Work out a sequence for the scribing, and a general procedure which differs if scribing into the plastic, primer or paint layers.
Technique
Begin from an endpoint as much as possible. Stop short of the next end point, swap direction – to prevent overruns.
Do lines that begin on an edge or other structural element first, as they are less risky for overrruns (IOW, avoid starting with lines that begin ‘in the middle’ of an area.)
Try and be consistent with everything the same to begin, then selectively deepen specific lines as needed.
Always secure the template with tape and or clamps, depending on the situation.
When using a tape guide, try and not press against the edge too strongly as it can distort
Doubled masking tape, cut with a sharp edge, can be used as a guide. Recommended when scribing in either primer or paint layers, especially on curved or compound curve surfaces.